Insulated Siding for Energy Efficiency: 2026 Professional Guide
The Comprehensive Guide to Insulated Siding and Thermal Performance
Insulated siding is a high-performance exterior cladding system that integrates rigid foam insulation with traditional siding materials, such as vinyl or composite. Unlike standard siding, which serves primarily as a decorative and water-shedding layer, insulated systems are engineered to improve the building envelope’s thermal resistance. This is achieved by adhering a contoured layer of expanded polystyrene (EPS) or graphite-enhanced polystyrene (GPS) directly to the back of the siding panels, creating a continuous barrier that wraps the entire structure.
This guide provides a neutral, technical examination of the materials and methods used to implement insulated siding for energy efficiency. Readers will learn about the physics of thermal bridging, the different categories of foam backing, and the practical logistical steps required for a successful installation. By understanding the interplay between R-values, permeability, and structural integration, property owners can evaluate how this technology functions as a long-term asset for reducing energy consumption and improving interior comfort.

Overview of Insulated Siding for Energy Efficiency
The core concept behind insulated siding for energy efficiency is the mitigation of “thermal bridging.” In traditional residential construction, wall studs act as bridges that conduct heat directly through the wall, bypassing the insulation located between the studs. Because roughly 25% of a wall’s surface area is composed of these wooden or metal studs, significant energy loss occurs even in well-insulated homes. Insulated siding addresses this by providing a continuous layer of insulation over the studs, effectively “blanketing” the home.
Property owners typically approach insulated siding as a comprehensive upgrade during a full exterior renovation. The primary goal is to increase the total R-value (thermal resistance) of the exterior walls by an additional 2.0 to 5.0, depending on the thickness of the foam. Beyond energy savings, expectations for these systems include improved impact resistance—as the foam provides a solid backing for the siding—and significant noise reduction from exterior sources. Success is defined by a more stable interior temperature and a reduction in the cyclic loading of the building’s heating and cooling systems.
Key Categories and Foam Variations
Insulated siding systems differ primarily in the chemistry of the foam used and the profile of the siding panel. These variations dictate the material’s thermal performance and its ability to manage water vapor.
| Category / Type | Description | Common Use Case | Effort / Cost Level |
| EPS-Backed Vinyl | Expanded Polystyrene adhered to vinyl planks. | Standard residential energy retrofits. | Moderate / Medium |
| GPS-Backed Vinyl | Graphite-enhanced EPS for 20% higher R-value. | High-performance homes in cold climates. | Moderate / Medium-High |
| Full-Back Composite | Engineered wood or fiber cement with foam. | Luxury builds; historical aesthetics. | High / High |
| Contoured Foam | Foam molded to match the specific “lap” of the siding. | Maximizing impact resistance and rigidity. | Moderate / Medium |
| Drainable Insulated | Foam with integrated grooves for moisture exit. | Regions with high rainfall and humidity. | High / High |
Choosing between these categories involves a trade-off between thermal gain and moisture management. For instance, GPS-backed systems are ideal for northern latitudes where heat retention is paramount, whereas drainable systems are essential in coastal or tropical environments to prevent moisture from becoming trapped between the foam and the house wrap.
Practical Scenarios and Applications
Scenario 1: The Northern Climate Retrofit
A property in a region with sub-freezing winters seeking to eliminate “cold spots” near exterior walls.
-
Components: GPS-contoured insulated vinyl siding and high-performance house wrap.
-
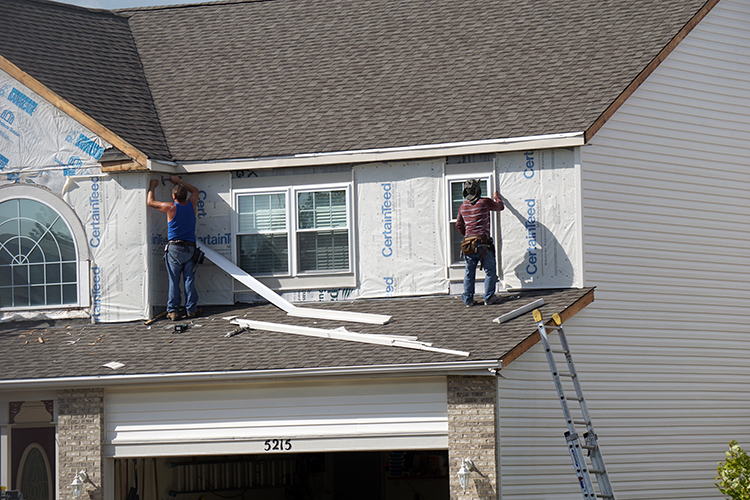
Steps: Strip existing cladding, tape all seams on the weather-resistive barrier, and install siding using specialized wide-mouth trim.
-
Relevance: This scenario targets the elimination of thermal bridging, which is most problematic when the temperature differential between indoors and outdoors is extreme.
Scenario 2: High-Traffic Coastal Exposure
A home located in a hurricane-prone or high-wind region where debris impact is a concern.
-
Components: Heavy-gauge insulated siding with a reinforced nail hem.
-
Steps: Install structural sheathing, apply a drainage mat, and secure the insulated siding with 2-inch galvanized nails.
-
Relevance: The solid foam backing prevents the siding from denting or “rattling” in high winds, providing a structural rigidity that hollow siding lacks.
Scenario 3: Urban Sound Mitigation
A residence located near a busy thoroughfare or airport where noise pollution impacts quality of life.
-
Components: Full-back composite insulated siding with high density.
-
Steps: Audit the wall for air leaks, seal penetrations with spray foam, and install the thickest available insulated panels.
-
Relevance: The dense foam layer acts as an acoustic buffer, significantly reducing the transmission of high-frequency sounds into the living space.
Comparison: Scenario 1 focuses on utility cost reduction; Scenario 2 prioritizes physical durability; Scenario 3 focuses on occupant comfort. Most homeowners in the United States find that a standard EPS-backed system provides a balanced ROI across all three categories.
Planning, Cost, and Resource Considerations

Meticulous planning is vital because insulated siding for energy efficiency requires deeper window and door “pockets” to accommodate the added thickness of the foam.
| Category | Estimated Amount / Effort | Explanation | Optimization Tips |
| Material Premium | 20% – 50% increase | The cost over standard non-insulated siding. | Select standard profiles to avoid custom molding fees. |
| Specialized Trim | $500 – $1,500 | J-channels and corner posts with wider openings. | Ensure trim is “built out” to match the new wall depth. |
| Professional Labor | Moderate-High Effort | Requires precise cutting around utilities/outlets. | Use installers certified by the Vinyl Siding Institute. |
| Permits / Inspections | $100 – $400 | Local municipal compliance for siding. | Check if energy rebates are available for R-value increases. |
Note: Figures are examples for 2026 and vary by regional labor rates. Insulated siding typically pays for itself through energy savings within 8 to 12 years in extreme climates.
Strategies, Tools, and Support Options
Successful implementation of an insulated system relies on maintaining the “breathability” of the wall while maximizing its thermal seal.
-
Permeable House Wrap: A fabric barrier that allows vapor to escape while blocking liquid water.
-
Advantages: Essential to prevent rot behind the foam. Disadvantages: Must be taped perfectly to be effective.
-
-
Wide-Mouth J-Channels: Specialized trim pieces that hide the thick cut edges of the foam.
-
Advantages: Provides a clean, professional finish. Disadvantages: Requires deeper window flashing.
-
-
Stainless Steel Fasteners: 2-inch to 2.5-inch nails used to penetrate the foam and enter the studs.
-
Advantages: Superior corrosion resistance. Disadvantages: Higher cost than galvanized steel.
-
-
Thermal Imaging: Using infrared cameras to verify the continuous seal of the new siding.
-
Advantages: Identifies “voids” where insulation may be missing. Disadvantages: Requires a professional auditor.
-
Safety, Risks, and Common Challenges
The increased thickness and chemical composition of the foam introduce specific challenges.
-
Moisture Trapping: If the house wrap is installed incorrectly, moisture can condense behind the foam and rot the wooden sheathing. Prevention: Use a “drainable” house wrap and maintain 1/4-inch gaps at all horizontal junctions.
-
Improper Nailing: Driving nails too tight into the siding slots. Result: The siding will buckle and warp as it expands in the sun. Prevention: Always leave a “penny’s width” between the nail head and the siding hem.
-
Melting Risks: Reflected sunlight from high-efficiency windows can melt the foam and siding. Prevention: Use “heat-resistant” vinyl formulations or install window screens to diffuse reflections.
-
Inadequate Flashing: Water entering around windows because the new, thicker siding pushed the trim out. Prevention: Install custom “head flashings” over every window and door.
Maintenance and Long-Term Management
While insulated siding is highly durable, it requires periodic stewardship to ensure the thermal barrier remains intact.
-
Annual Cleaning: Use a soft brush and a garden hose to remove dirt and algae. Avoid high-pressure washers, which can force water behind the foam.
-
Pest Inspection: Termites or ants can occasionally tunnel into EPS foam. Action: Inspect the bottom “starter strip” annually for signs of entry and keep soil 6 inches below the siding.
-
Sealant Review: Check the caulk around windows and doors every 2 years. As the house settles, gaps can form that allow air to bypass the insulation.
-
Visual Alignment: After high-wind events, ensure all panels are still “clicked” into their locking channels to maintain the continuous thermal barrier.
Documentation and Reporting
Detailed record-keeping is essential for home appraisals and for verifying energy performance improvements.
-
R-Value Certification: Save the manufacturer’s data sheet stating the specific R-value of the installed system.
-
Before/After Energy Bills: Documenting 12 months of utility costs following the installation to track the ROI.
-
Warranty Documentation: Most premium insulated systems offer a “Lifetime” limited warranty on both the siding and the foam bond.
Example 1: A homeowner provides the R-value certificate to a buyer’s appraiser to justify a higher resale price based on “Energy Star” compliance.
Example 2: An owner maintains a photo log of the “flashing and house wrap” phase to prove to an insurance company that the building envelope was correctly sealed.
Closing Summary
The implementation of insulated siding for energy efficiency is a significant technical upgrade that addresses the structural limitations of traditional wall framing. By providing a continuous thermal break, these systems effectively reduce energy loss through studs and improve the building’s overall resilience against impact and noise. Success in this approach depends on selecting the appropriate foam chemistry for the local climate and ensuring that the thicker wall assembly is correctly flashed and ventilated to prevent moisture accumulation.
FAQ
1. How much R-value does insulated siding actually add? Most systems add between R-2.0 and R-5.0 to the wall. While this sounds small, it is a “continuous” R-value, which is significantly more effective than the “cavity” insulation found between studs.
2. Does insulated siding look different from regular siding? From a distance, they look identical. However, up close, insulated siding has a more rigid, “solid” appearance and does not “give” or rattle when pressed, as it has a solid foam core.
3. Will insulated siding make my house too “tight” and cause mold? When installed with a high-quality, breathable house wrap, the system allows vapor to escape while blocking liquid water, ensuring the house remains dry and well-ventilated.